Joins and Relates#
Joins and relates represent a fundamental concept in database management. These tools are used to associate two or more tables with each other based on a shared field or column. For example, a table of excavation units showing ceramic finds could be joined or related to a similar table of excavation units with lithic finds to create a single representation of excavation units, alongside ceramic and lithic finds.
Add Relate#
The Add Relate tool has the same functionality as the Join Field tool, however, it does not generate a new table output with joined features. Instead, relate tools temporarily connect two independent tables. These tables remain independent but when a field is clicked on one table, the related field will also be selected on the other table.
When running the Add Relate tool, you can specify a name for your relate. This can be useful if you plan on having several tables related to each other.
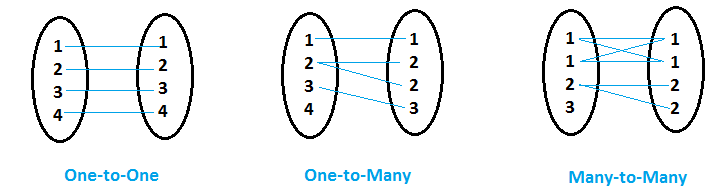
Cardinality refers to number of related records from one table to the next. In a one to one relationship (the most straightforward), each record in one table has a single related record in the other table. In a one to many relationship, a record in one table may relate to multiple records in the other table. In a many to many relationship, multiple records in one table may have multiple related records in the other table.
Source:
To run the Add Relate tool, the two tables must share a column with values of the same data type. These columns are defined under Input Relate Field and Output Relate Field.
Note that the related table cannot be in the .csv format. The table must be converted to either a geodatabase or .dbf format before running the Add Relate tool. To export a new table with the correct file extension format, right-click on the table under Standalone Tables, and click Data -> Export Table. The default file extension will populate, click OK.
Once the tool is run, open the attribute tables and select a record/row in one of the tables. Click the hamburger settings icon at the top right of the table (three horizontal lines), and click Related Data -> then the name of the related table. In the other table, the related record will also be selected. To switch back to the full view of the table, click the Show all Records button at the bottom left of the table.
The relationship can be deleted at any time by clicking the hamburger settings, Joins and Relates -> Remove Relate. To permanently relate two tables, use the Join Field tool.
Add Join#
The Add Join option is similar to Add Relate in that it joins two tables temporarily until exiting ArcGIS Pro. The Join Field tool is permanent and takes two tables as input, including the input table, which will define the structure of the output table, and a join table, which has fields that will be added to the input table. Both tables must share a field in column for the join to be successful. The Join Field tool can be applied to any type of table, including attribute tables or standalone tables.
Spatial Join#
The Spatial Join tool can only be applied to spatial data with an attribute table. In this scenario, the attribute tables need not share a field. Instead, the two feature classes must have a meaningful spatial relationship. These spatial relationships are similar to the options in the Select Layer by Location tool. For example, if two feature classes intersect, the intersecting records can have data from one table joined with the other. Spatial Join is a very powerful tool that can add relevant spatial data from a join table to an input table.
Compared to relates, joins cannot handle these types of multiple relationships as well. When using tools like Spatial Join, the Join Operation can be set to Join one to one or Join one to many.
In the Join one to many option, each joined record will occupy it’s own record. For this reason, when using the Join one to many option, new records will be generated in the new table.
When the Join one to one option is selected, when multiple records are identified that relate to the target table, a single record will remain in the new table, by default with only the first record listed. The Join Count column will display the number of joins (0, meaning no joins, 1 meaning all joins were a one to one relationship, and any value greater than 1 meaning that multiple records shared the assigned relationship). To include all join records in the same data cell, we use a technique called Field Mapping. Under Fields, click the relevant field and the pencil or edit icon to the right. A Field Properties window will display. Under Actions and Source Fields, First is the default. This can be changed to Concatenate, for example, and the separator can be defined (default is a comma). Once selected, now cells with multiple joins will display all values separated by a comma.